
In the previous article “ Calculux Software for Lighting Design – Part One “, I explained the main window of Calculux Indoor Software and the dropdown menus in the menu bar.
And in the In the previous article “Calculux Software for Lighting Design – Part Two". I explained how to check and adjust the default settings of Calculux.
Today I will explain complete example for lighting design calculations by using Calculux Indoor Software as follows.
Example for lighting design calculations by using Calculux Indoor Software
Design a general lighting scheme of an office using CALCULUX. The office details are as folows:
- Dimensions : Width 3.50 m - Length 5.60 m - Height 2.70 m - Working Plane Height 0.80 m,
- Reflections : Ceiling 0.50 - Walls 0.30 - Floor 0.10,
- Position (of Left Front side of the room): X = 0.0 Y =0.0,
- Required illuminance level: General lighting 300 lux on working plane,
- Luminaire Specifications: Luminaire type TBS600/135 C7-60,
- Lamp type: TL5 35W,
- Project Maintenance Factor 0.80.
Answer:
Step#1: Checking the default settings of Calculux
1- Do it as explained in the previous article "Calculux Software for Lighting Design – Part Two".
Step#2: Starting a new Project
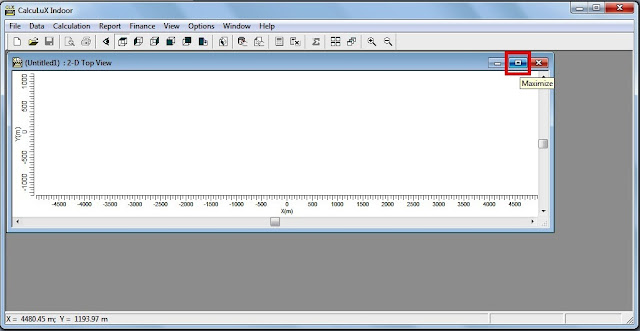
1- Select New Project from the File menu.

2- A new empty window will be created. You can maximize the view if you wish.
Step#3: Enter the project data
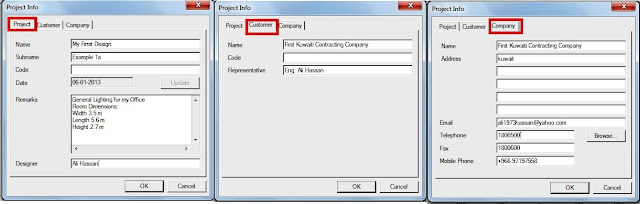
1- Select Project Info from the Data menu.

2- Add Information in Project tab about your project, as in the following table for example:
Name:
|
My First Design
|
Subname:
|
Example 1a
|
Remarks:
|
General
Lighting for my Office
Room
Dimensions:
Width 3.5 m
Length 5.6 m
Height 2.7 m
|
Designer:
|
put 'Your Name'
|
In the
Customer tab:
|
put data
about your customer,
|
In the
Company tab:
|
you can enter
company information
|
or you can enter company information by select a vignette file by clicking Browse.
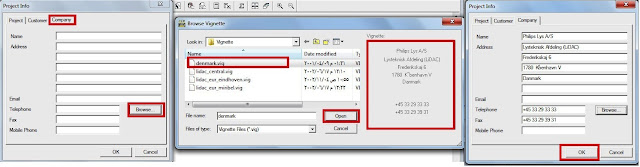
3- Click OK to return to the Main View.
Step#4: Setting Project Options
1- Select Project Options from Data menu.

2- In the general tab , Calculation box:
- Disable (no checkmark) 'Luminaire Splitup'
- Set 'Project Maintenance Factor' to: 0.80

In general, for indoor lighting designs, the luminaire split-up is needed only for precise calculations, such as indirect lighting (uplighter).
3- In the 2D View tab and 3D View tab:
Disable 'Aiming Arrows'.
4- Click OK to return to the Main View.
Step#5: Specifying the Room
1- Select Room from the Data menu.

2- Select the Definition tab.
In the Dimensions box, enter the dimensions of the room:
- Room Width 3.50 m
- Room Length 5.60 m
- Room Height 2.70 m
- Working Plane Height 0.80 m
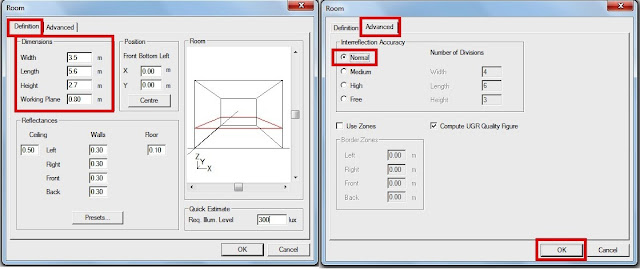
- In the Position box you can define the position of the Left Front corner of the room. By means of the 'Centre' button you can position the centre of the room in origin (x=0, y=0). For this project the position of the Left Front corner is 0,0.
3- In the Quick Estimate box you can specify the requested illuminance level as general lighting. The value you specify will be used by Calculux to calculate the number of luminaires needed to meet the required Illuminance level.
In the 'Required Illuminance Level field', Enter 300 lux.
4- in the advanced section,
In the Interreflection Accuracy box you can specify the accuracy of the interreflection calculations. Select Normal.
5- Click OK to return to the Main View.
Step#6: Selecting Project Luminaires
To select Project Luminaires, we have two methods:
A- Select Project Luminaires from the Data menu Or
B- Click on Toolbar shortcut button.

A- Selecting Project Luminaires from the Data menu
1- Select Project Luminaires from the Data menu.
2- Click Add and select Database.
In the Application Area box you can select the application area(s) you want to use.
Select Indoor Lighting

3- Click Open.
In the Add Project Luminaires dialogue box, select the family name and/or family code of the luminaire:
- Family Name TBS600
- Family Code TBS600

By default both the family name and the family code are set to 'any' (no luminaires will be selected). Nevertheless, you should select 'any' for the family name if the family name is unknown or select 'any' for the family code if the family code is unknown.
4- Select the housing and light distributor of the luminaire, select:
- Housing TBS600/135
- Light Distributor C7-60
5- Click Add.
6- Click OK, then Close (twice) to return to the Main View.

OR
B- Clicking on Toolbar shortcut button.
1- Click on in the Calculux menu bar.
Select the housing and light distributor of the luminaire, select:
- Housing TBS600/135
- Light Distributor C7-60
2- Click Add.
3- Click OK to return to the main View.
If the luminaire is not in your database you can select another Indoor luminaire. If you wish you can view luminaire details by clicking on the Details button.
Step#7: Positioning luminaires
Calculux allows you to position luminaires individually as well as in arrangements. For 'First Project' you will create a Room Block arrangement. The number of luminaires needed will be calculated according to the utilization factor (UF factor).
1- Select Arranged Luminaires from the Data menu.

2- Click Add and select Room Block.
In the UF Method box you can see that 3.5 luminaires is sufficient for the requested
illuminance level of 300 lux as general lighting.
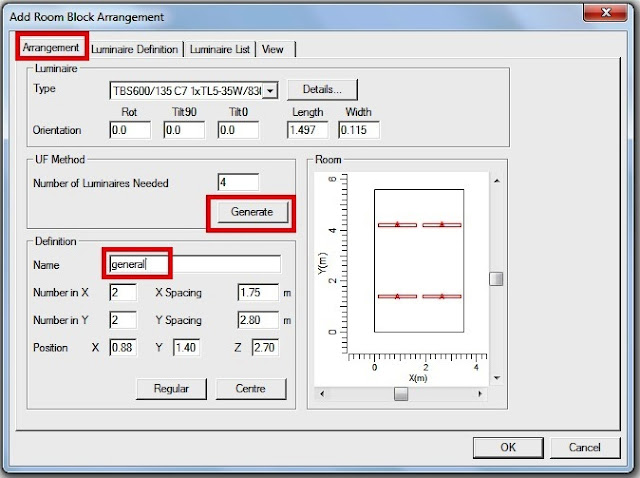
3- Click Generate.
A Room Block arrangement of 4 luminaires will be generated.
In the Definition box enter the name of the arrangement, enter: Name General
4- Click OK, then Close to return to the Main View.
Step#8: Defining a (calculation) grid
Before a calculation can be performed a (calculation) grid has to be defined. You can define your own grid, define a grid according to a rule or use a preset grid. For this project you will use a preset grid.
1- Select Grids from the Data menu.

2- Click Add in the Grids dialogue box.
In the Add Grid dialogue box, enter the name of the grid, enter: Name Working Plane
In the Coupling box, select: Connected to Working Plane.

5- Click OK, then Close to return to the Main View.
Step#9: Performing a calculation
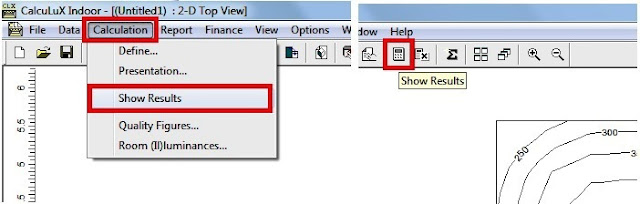
All settings concerning the definition or presentation of a calculation for a specific project are performed in the Calculation menu. For 'First Project' project you will use the default settings (as previously done), so no settings have to be done.
1- Select Show Results from the Calculation menu. The calculation will be performed.
Step#10: Printing the report
All settings concerning the contents and layout of a report for a specific project are normally done in the Report menu. For 'First Project' project you will use the default settings (as previously done).
1- Select Print Report from the File menu.

2- Click OK in the Print dialogue box to print the report.
Step#11: Saving the project
In case you wish to redesign the project later, it is advisable to save the project.
1- Select Save from the File menu.
Enter the file name, enter: File Name Office 1.cin
2- Click OK to save the project.

3- Select Exit from the File menu to close the program.
The final report will be like the following image:

You can download the final report for this example by clicking on the link.
In the next article, I will explain additional tasks that can be done in lighting design calculation by using CalcuLux Indoor Software. Please, keep following.

1- first why you Disabled "Luminaire Splitup" ? or why you donot want a precise calculations here ?? can yu explain more of this option ??
ReplyDelete2- what is "Aiming Arrows" and why we always disabling it ???
3- what is Interreflection Accuracy ??
4- when i try to print my report,it not saved as pdf but it saved as " .xps ???
Hi medo88,
Delete1- in general,for indoor lighting design, the luminaire splitup is needed for special calculations like indirect lighting (up lights.
2- the "Aiming Arrows" are used to show that accent lighting fixtures are aimed to a wall or object. it was explained in article on the following link:
http://www.electrical-knowhow.com/2013/01/calculux-software-for-lighting-design_8.html
3- when you determine the reflectances for the room walls, floor and ceiling, you use uniform values but actually these values is not the actual ones due to lot of factors , for example the reflectance of light on a wall will effect the quantity of light falling on adjacent wall. so, if it is important to you to take the interreflections into account in design, you must select a higher accuracy value for interreflection, but take care that the program will tale long time for making such calculations.
4- CalcuLux save projects file as its file type (CIN), if you want to print the report as PDF file, you must have a PDF printer ( PDF printers are available on the internet and you can install one to your PC) after this you can print and save the report as PDF file.
if you have any other questions, please leave a comment.
thanks
hai i m velu , Now i m studying in BE so i research in led lighting technology. so i want calculux software.how to i get this software free download.
Deletethere is a link under the paragraph "install the program" in article “ Calculux Software for Lighting Design – Part One “, go there and click on it. and click also on the data base link in the same paragraph to download it also.
Deleteif you have any other questions, please leave a comment.
thanks