
- Lumen (Room Cavity) method - Part One
- Lumen (Room Cavity) method - Part Two
- Point by point method,
- Watts per square foot method.
Also, I explained lighting design calculations by using CalcuLux Indoor software in the following articles:
And I explained also the easy manual for lighting design calculations by using DIALux software in the following articles:
I explained the Lighting Design Calculations by Using Excel Spreadsheets in the following previous article:
- Calculux Software for Lighting Design – Part Six
- CalcuLux Indoor Software for Lighting Design – Part Seven
And I explained also the easy manual for lighting design calculations by using DIALux software in the following articles:
I explained the Lighting Design Calculations by Using Excel Spreadsheets in the following previous article:
- GE Lighting Assistant 3.0
- Siemens lighting calculator
- Internal lighting calculator
- The Lighting Calculator Ver.2.20
Today, I will explaining Lighting Design Calculations by Using On-line Tools as follows.

The Visual Design Tools are a set of web based tools that allow users to analyze many common lighting scenarios and view photometric files. The Design Tools can be used to quickly calculate scenarios with simple geometries where inter-reflected light will not significantly affect the resulting illuminance. This is true for many outdoor lighting scenarios e.g. Parking Lots and Exterior Facade Floodlighting.
Note: Complex lighting designs and geometries should be studied by professional software programs.
These tools include:
1- Interior design tools
2- Exterior design tools
3- Report tool
In this article, I will explain only the interior lighting design tools and other tools will be explained later with the exterior lighting design tools.

Advantages:
Disadvantages:
1- The Visual Interior Tool is designed to perform lumen method calculations on a rectangular room.
2- The interior tool work based on the following assumptions:
3- Because the lumen method provides an average illuminance, point values for calculations might vary considerably. Please use the professional addition of Visual for full lighting analysis.
How to use the interior lighting design tool?
1- Enter project info. In the place shown in the following image as follows:


You need to enter the following data:
2- Select the units of measurements of lighting quantities and space dimensions from the drop-down menu shown in the following image:

You can choose between (4) combination of units as follows:
3- Enter the room dimension in the shown place in the below image and as per the used units
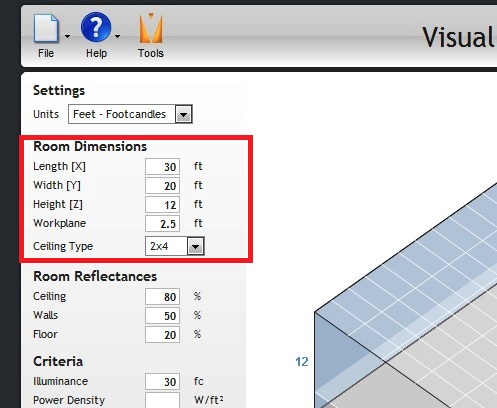
4- Select the type of the ceiling for the case under study from the dropdown menu shown in below image:

You can choose one of the following ceiling types:
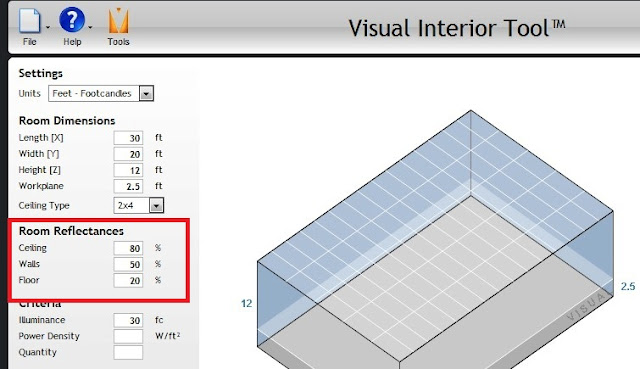
5- Enter the room reflectances in the place shown in below image:
6- Choose the desired criteria of calculation as shown in below image:

You can select one criteria from the following:
7- You can apply some constraints (if any) to the calculation process as shown in below image:
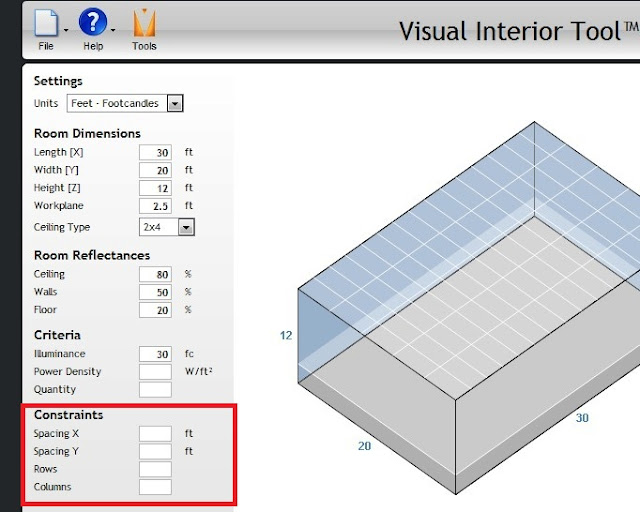
You can apply on or more constraint from the following:
8- Click (+) tap to select a product (Luimenaire) by navigations through the lists as shown in below image:


Note:
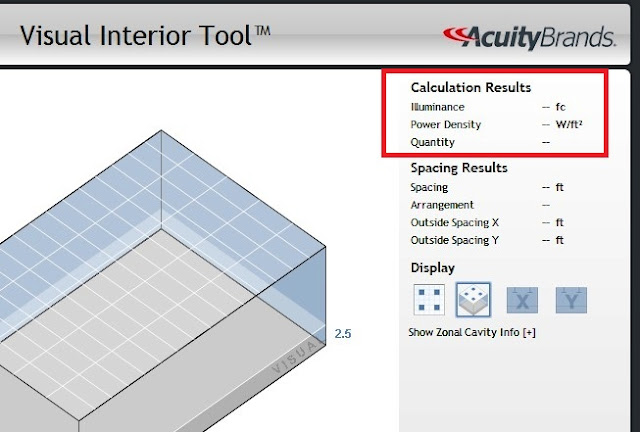
9- After completing the selection of product, the calculation results will be shown immediately as in below image:

12- You can show/Hide Zonal cavity info. Which are shown in the collapsible panel below the Display settings as in below image:

13- Using the file menu:
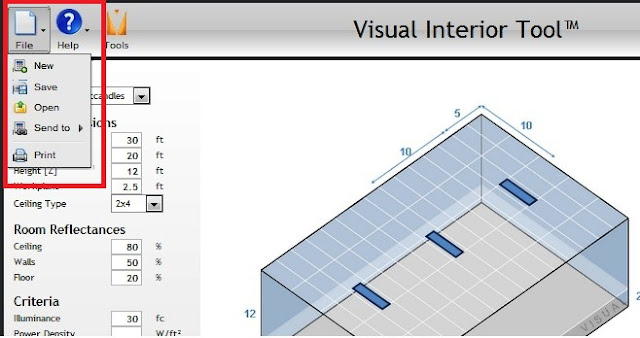
From the file menu, you can do the following:
14- Using the Help menu
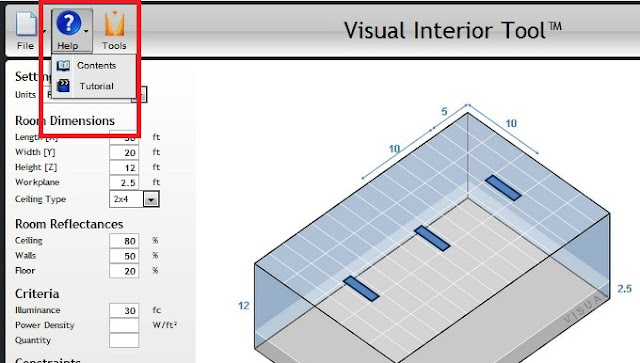
From the help menu, you can do the following:
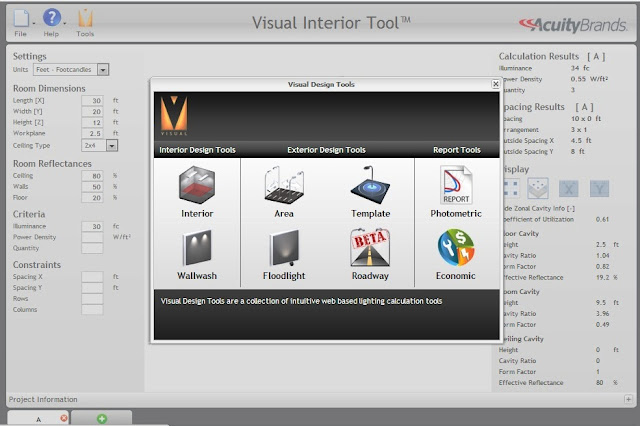
15- Click on tools menu, a new window will open showing all Visual lighting design tools as per the following image:
In the next article, I will explain Lighting Design for Special Activates (Facade, Floodlighting, ...). Please, keep following.
The Visual Lighting Design Tools

The Visual Design Tools are a set of web based tools that allow users to analyze many common lighting scenarios and view photometric files. The Design Tools can be used to quickly calculate scenarios with simple geometries where inter-reflected light will not significantly affect the resulting illuminance. This is true for many outdoor lighting scenarios e.g. Parking Lots and Exterior Facade Floodlighting.
Note: Complex lighting designs and geometries should be studied by professional software programs.
These tools include:
1- Interior design tools
- Interior Tool
- Wallwash Tool
2- Exterior design tools
- Area Tool
- Floodlight Tool
- Template Tool
- Roadway Tool
3- Report tool
- Photometric Tool
- Economic Tool
In this article, I will explain only the interior lighting design tools and other tools will be explained later with the exterior lighting design tools.
First: Interior Tool
The interior tool use The lumen method to determines average illuminance achieved on the workplane using a derived property of luminaire photometrics and room geometry called the coefficient of utilization.
Usage:
Usage:
- The Interior Tool will calculate the number of luminaires needed to meet an average illuminance across the workplane for an enclosed rectangular room using the principals of the lumen method.
- You can also use the Interior tool to determine the illuminance achieved by a specified lighting power density or luminaire quantity.
Advantages:
- Easy loading of multiple IES files into the tool
- Isometric, elevation and reflected ceiling views
- Learn about how the Lumen Method Works by showing the Zone Cavity Info. Window.
- Quickly calculate simple rooms
- (3) Alternative inputs (illuminance , power density and luminaire quantity)
- (3) Outputs (illuminance , power density and luminaire quantity)
- Availability of (4) different units
- Availability of applying some constraints to the design process
- Availability of making calculations with multi luminaires for the same room in the same window and compare between them based on their calculation results to select the best one.
Disadvantages:
1- The Visual Interior Tool is designed to perform lumen method calculations on a rectangular room.
2- The interior tool work based on the following assumptions:
- Luminaires are spaced uniformly,
- Room is empty,
- Surfaces are diffuse,
- Surfaces have neutral color.
3- Because the lumen method provides an average illuminance, point values for calculations might vary considerably. Please use the professional addition of Visual for full lighting analysis.
How to use the interior lighting design tool?
1- Enter project info. In the place shown in the following image as follows:


You need to enter the following data:
- Project name
- Project description
- Your name
- Company name
- Your phone
- Your email
2- Select the units of measurements of lighting quantities and space dimensions from the drop-down menu shown in the following image:

You can choose between (4) combination of units as follows:
- Feet-Footcandles
- Meter-Lux
- Feet-Lux
- Meter-Footcandles
3- Enter the room dimension in the shown place in the below image and as per the used units
4- Select the type of the ceiling for the case under study from the dropdown menu shown in below image:

You can choose one of the following ceiling types:
- Open type (no false ceiling),
- False ceiling with tails 2x2, 2x4 and 4x2 feet.
5- Enter the room reflectances in the place shown in below image:
6- Choose the desired criteria of calculation as shown in below image:

You can select one criteria from the following:
- Put the illuminance to calculate the number of units,
- Put the power density (w/ft2) to calculate the number of units,
- Put the quantity of units to calculate the illuminance and power density (w/ft2).
7- You can apply some constraints (if any) to the calculation process as shown in below image:
You can apply on or more constraint from the following:
- Predefined Spacing in X direction,
- Predefined Spacing in Y direction,
- Predefined Nos. of rows,
- Predefined Nos. of columns.
8- Click (+) tap to select a product (Luimenaire) by navigations through the lists as shown in below image:


- Or, you can use the search tool directly if you know the Luminaire part number.
- You can edit the selected luminaire information shown in the luminaire tab such as Light Loss factor and Orientation.

- You can select other luminaires by the same way in above, in this case a comparison window will appear showing a comparison between selected luminaires for the same space based on their calculation results to select the best one for the case under study.

- You can delete any luminaire if you don't need it anymore by clicking the rod cross in its tab in the luminaire tap window.
Note:
- In the luminaire tab, there is a link under the shape of selected luminaire that provide the luminaire specs sheet.
- In the luminaire tab, if you click on the photometric chart of the selected luminaire , the photometric tool will open showing a lot of information for that luminaire.
9- After completing the selection of product, the calculation results will be shown immediately as in below image:
The calculation results include:
10- Also, the Spacing results (if not constrained before in step# 7 ) will be shown immediately as in below image:
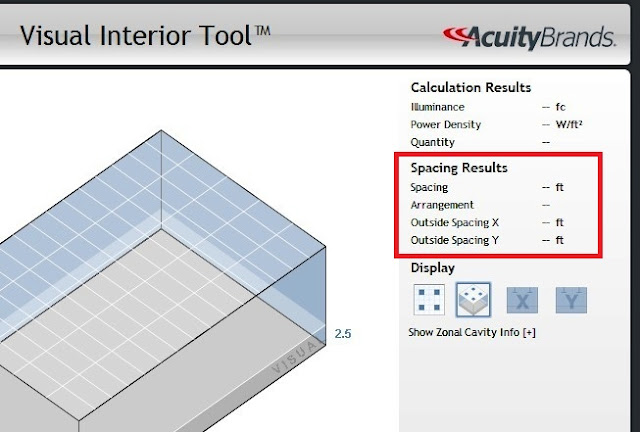
The calculation results include:
11- You can choose your preferred view for displaying results as shown in below image:
- Illuminance,
- Power density,
- Quantity.
10- Also, the Spacing results (if not constrained before in step# 7 ) will be shown immediately as in below image:
The calculation results include:
- Spacing,
- Arrangement,
- Outside spacing in X direction,
- Outside spacing in Y direction.
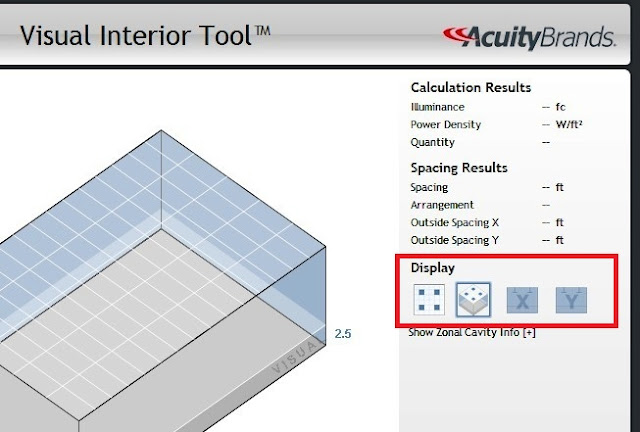
11- You can choose your preferred view for displaying results as shown in below image:
You can choose one view from available four ones as follows:

- 2-dimension view (plan view),
- 3-dimension view (Isometric view),
- X direction view (elevation view),
- Y direction view (side view).
12- You can show/Hide Zonal cavity info. Which are shown in the collapsible panel below the Display settings as in below image:

Note: These values are provided to help those curious about how the zonal cavity method works see the intermediary values that must be calculated in order to perform the calculation.
13- Using the file menu:
From the file menu, you can do the following:
- Select New to start a new calculation.
- Select Save to save finished calculation.
- Click Open to open a saved calculation from its directory folder.
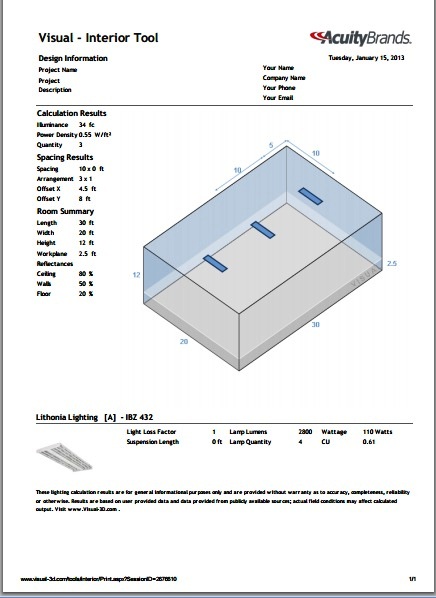
- Select print to print a calculation report; a calculation report will be as in the following image:
14- Using the Help menu
From the help menu, you can do the following:
- Select contents, a new window will open showing information about the interior tool.
- Select Tutorial, a new window will open showing a tutorial video for using indoor tool.
15- Click on tools menu, a new window will open showing all Visual lighting design tools as per the following image:
- If you want to use this tool, click the link:
- And, if you want to see the help tutorial video for indoor tool, click the link:
In the next article, I will explain Lighting Design for Special Activates (Facade, Floodlighting, ...). Please, keep following.

مدونة اكثر من رائعة جزاك الله خيرا
ReplyDelete